How to take HDR photos with a DSLR
If you are like me (and if you are there's no helping you!) you may have noticed a lot of buzz about HDR photography in the past 12 months. Having been suitably impressed by the results obtained by others using several multi-bracketed shots and combining their images of different exposures together to make one High Dynamic Range image I thought I would give it a go.
How to create an HDR image using a DSLR
Step1 What you'll need to follow along at home is a camera with the ability to take multiple shots at once (or very closely together). This is called exposure bracketing on my Pentax K200d camera this option is available by hitting the fn button then up arrow, and right arrow to select.
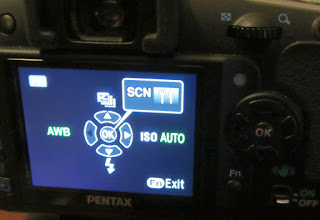

Check the manual of your DSLR or if you have a newer advanced P&S you might have a similar option. No such option exists on my Canon SX230HS however so I think most P&S photogs are going to be out of luck.
Note: You could still try your hand at HDR photography if no 'bracketing' option is available on your cam but you'll need a tripod and be willing to quickly navigate your camera's menu settings to adjust the exposure compensation settings between quickly shooting 3 or more consecutive images (for combining later in software). Be wary of moving subjects!
Step2 Now that you have your camera ready for taking 3 different exposed photos of the same subject you need to find something interesting that would be difficult to 'expose' correctly in just one shot, otherwise what's the point? So you'll notice lots of HDR photos of landscapes with vast blue skies, dark mountains (possibly snow topped) and light foreground fields of green grass and/or blooming flowers. Now that would be a difficult scene to capture in 1 go and expose the sky, middle and foreground correctly so by 'exposure bracketing' and hitting the shutter release button we'll get one image exposed as the camera thinks it should, one under exposed photo and one over exposed photo (not necessarily saved to your SD card in that order).

Image taken with +1.00EV (over exposed)

Image taken with -0.5EV (under exposed)

Image taken with 0EV (ie, exposed normally)
Step3 The magic now happens in software when combining your images together in to one HDR photo. This could be accomplished manually using techniques posted on several other blogs in Photoshop so I won't repeat that here or you can purchase (or try out a trial version) of some HDR software to easily to it for you. For the purposes of this blog post I'm trying out 'HDR Expose' which does the hard work for us but can still allow a certain level of tweaking if so required.

As you start up the application you will be prompted with a few options, we're going to choose to create/merge a new HDR image, then + and browse for the first of the 3 (or more images) you took earlier of various exposures for importing.

Tip: If you don't see your images make sure you choose FileType that matches your extension, in my case I chose JPEG to see the files saved by my camera) and I just used the default settings and just clicked 'merge' et voila I now had my first HDR photo and you could to!

Now, alas as I type this posting I haven't had the chance to hit the countryside surrounding Boston (it's just been too darn cold this week) but I did attempt the above technique with a less ideal subject, the Christmas tree that is on its last legs in our living room which was a very low light situation. Not an ideal subject but it will suffice for now.
The final result
Each frame shown above is combined and the end result is as below, I have to say I am not very impressed at all but I guess you get out what you put it. I will have to re-attempt the above technique on the Boston Skyline once I get a chance sometime later this month and update this post accordingly.


Comments